Mbm329 23:20, March 9, 2012 (UTC)
So a while after the long drawn-out creation of my similar GNU Screen document, I was clued in by my friend Jason, that tmux might have something I'd like. He was right. I've left the post intact, but deprecated it in favor of this method for myself. In this post, I'll keep the same content and replace the pertinent information so that it relates to tmux and vanilla PuTTY.
There are plenty of methods people use to administer UNIX hosts. From separate telnet windows directly into the individual hosts, to tabbed terminal clients. Everybody has their own preferences. That is what this doc is; my preference.
This method of accessing UNIX hosts pretty much involves a virtual tab for each "project", and then "tabs" within those tabs indicating which host I'm logged into when the tab is idle, and what command is being run when it's not. This is purely my preference, and it works for me. Breaking away from a single window per system methodology is a lifestyle change. It does take some getting used to. But after using this, I will probably never go back.
The benefits you will gain with the following guide:
- Instantly pick up where you left off after a crash/reboot/network disconnect/etc...
- Access all your hosts seamlessly by entering a single password once (each time you boot your laptop/desktop).
- Single window for accessing all hosts as many times as you want, virtually uncluttered.
- Simplistic separation of projects or tasks from one another.
- Always know which host you're logged into.
- Always know what command is running in your sessions at a glance.
The Ingredients
Shell Server
The shell server is key to centralized management of an array of systems. From the shell server, you can have a single point of contact to access all systems and host scripts and utilities that assist in the management of your systems. Another important key aspect of the shell server is that it is not a system that would need to be shutdown when you go home, and less likely to crash than your laptop w/ a billion browser tabs open or that you just recompiled your kernel on so you could get support for that new camera you just bought.
I happen to favor a Linux system for a shell server as it is extremely versatile in capability, and usually has all the luxury tools available at it's disposal. Software outside of package management is generally easy to compile and less error-prone during build times.
Simply put, the shell server can be any system that is in your place of business running 24/7 that will act as your gateway to all your systems. With this setup, you generally would not access your systems directly from your workstation. It's worth noting that the shell server does not have to be a new expense to your business. Any *nix system that can run SSHD and tmux will do; a virtual machine running Linux does the trick for me.
SSH Daemon
To communicate with your systems, you will want to use SSH. Telnet is older and less secure. And forget about that $150 suite of software that acts as an X-server+remsh client that, in turn, runs xterm on the UNIX server you're trying to access. SSH can provide key authentication, port tunneling, X11 forwarding, and much other goodness. This is a necessity. Oh, btw, don't pay for it; it's free. Use OpenSSH. The others don't get you anything special no matter how much they say they will. By now, most UNIX/Linux/BSD systems run ssh as standard.
Used ssh before, but never setup the publickey access because it seemed too complicated? No worries, I'll take you through it further in the doc. It's simple. You will wonder how you ever got along without it.
tmux
Remember the shell server? Remember when I mentioned that you don't have to shut it down when you go home? Run tmux on your shell server, and you will be able to keep your terminal sessions open when you shutdown your laptop and take it home. tmux will spawn it's own session once you're on the shell server. You can do whatever inside the tmux session, then detach from the session and go home. This will be key as you will not have to remember where you left off on certain windows or recover from a dropped wifi connection when you're on-call at a Waffle House at 2AM trying to sober up. Yes, you know you've been there. If not, you will be now.
tmux basically has three levels of abstraction. The session. This level occurs automatically when you spawn tmux. Each session can have multiple windows. In turn, each window can have multiple panes. These panes can be moved within and between windows, and the windows can be moved within and between sessions. While in tmux, all commands you feed to it begin with "^b" (that's CTRL+B). However, with my configuration, I changed this to be "^a" for legacy comfort with GNU Screen. To open a new window within a tmux session, you would use ^a,c. You now would have two windows within the tmux session. More details to follow!
Like with SSH, most variants and flavors of UNIX have a tmux package available for install. Of course, you can always compile it from source code which is actually the preferred method, as it updates more frequently than the distributions do. Also make sure you have a recent libevent as tmux will function much better with an updated version.
Terminal/SSH Client
So you got all this goodness, how the hell are you gonna interface with it? You need a terminal/ssh client. It's pretty simple here. If your workstation/laptop is running Linux, you most likely have an assortment of flavors to choose from, all free. If you're running Windows, I'd go with PuTTY. Unlike the previous (now deprecated) article, no tabs will be necessary with this client; tmux will handle those for you.
If you're running Linux, there's Gnome Terminal and Konsole among others. I'll use Gnome Terminal throughout this guide.
The Recipe
Getting from your laptop to your shell server
First things first. You need to connect to your shell server using your terminal client. Sure, you could just open your terminal client up and make an ssh connection to your shell server. But we're a little more hardcore than that. When we can spend a little time up front to setup things, it will save us time on the back end applying them. Trust me, when you can enter your password once, make two mouse clicks to have 15 sessions at your disposal, and re-attach to the 40+ connections you had open into your server farm yesterday before your workstation crashed or you recompiled your kernel for that new supercool USB gadget, you will appreciate it.
Generate Key Pair
Remember when I said ssh has key authentication? Key authentication will allow you to enter your password once from your laptop to access the shell server as many times as you need to. You'd be a fool not utilize such delicious functionality.
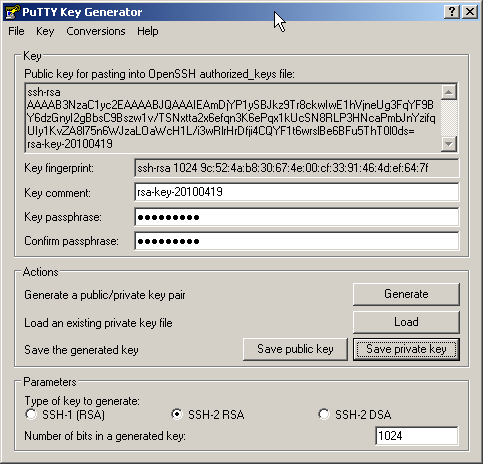
- Windows: Download PuTTY's "PuTTYgen" utility and execute it. During key generation, you will need to enter a passphrase. If you don't, and your key is stolen, it can be used to access all the systems you can access. This is extremely important. Remember, I said you could just enter the password once on your system and connect to the shell server as many times as you want. It's a small price to pay for peace of mind (and in many cases, your employment). After your key is generated, save the public key and the private key to a directory only you have access to if other users share your laptop ("My Documents" or something similar).
- Linux: Execute /usr/bin/ssh-keygen and follow the prompts. Your key should be stored in ~/.ssh. Read the "Windows" section above about entering passwords.
$ ssh-keygen
Generating public/private rsa key pair.
Enter file in which to save the key (/home/mbm/.ssh/id_rsa):
Enter passphrase (empty for no passphrase):
Enter same passphrase again:
Your identification has been saved in /home/mbm/.ssh/id_rsa
Your public key has been saved in /home/mbm/.ssh/id_rsa
The key fingerprint is:
ce:c4:a5:06:3a:c0:e2:8b:a1:85:1c:9d:64:87:c8:49 mbm@hostname
Place Public Key on Shell Server
Place the contents of the public key that was generated into ~/.ssh/authorized_keys file on the shell server, ensuring no linebreaks are present. Also, re-perm this file so you are the only one able to read/write to it.
$ chmod 600 ~/.ssh/authorized_keys
SSH Authentication Agent
Here is where the ability to enter one password for all the connections to your shell server happens.
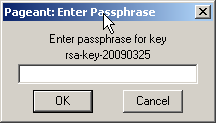
- Windows: Download PuTTY's "Pageant" utility and execute it. An icon will appear in your taskbar. Right-click on it, and select "Add Key". Give it the path to where your private key (.ppk) is stored. I've found that it's best to create a shortcut to pageant.exe in the "Startup" folder under the Applications menu so that it runs on bootup. Right-click the shortcut, choose "Properties", and use the following as the "Target" line: "C:\full\path\to\pageant.exe" "C:\full\path\to\rsa.ppk". This will also be the window that will show when your system boots if you placed the shortcut in your Startup folder.
- Linux: Place the following script in your .profile (you may use .bashrc or .bash_profile):
#SSH Agent Startup Modified from: http://mah.everybody.org/docs/ssh#run-ssh-agent
SSH_ENV="${HOME}/.ssh/environment"
start_agent() {
  echo "Initialising new SSH agent..."
  if [ ! -d ${HOME}/.ssh ] ;then
    mkdir -p ${HOME}/.ssh
    chmod 700 ${HOME}/.ssh
    touch ${SSH_ENV}
  fi
  /usr/bin/ssh-agent | sed 's/^echo/#echo/' >"${SSH_ENV}"
  rval=${?}
  if [ ${rval} = 0 ] ;then
    echo "Succeeded!"
    chmod 600 "${SSH_ENV}"
    . "${SSH_ENV}" >/dev/null
    /usr/bin/ssh-add
  else
    echo "Failed to write ${SSH_ENV}"
  fi
}
# Source SSH settings, if applicable
if [ "$(tty)" != '/dev/console' ] ;then
  if [ -f "${SSH_ENV}" ]; then
    . "${SSH_ENV}" >/dev/null
    if ! ssh-add -l | egrep '.ssh/id(entity|_dsa|_rsa)' >/dev/null ;then
      if ps -fp ${SSH_AGENT_PID} | grep ssh-agent$ >/dev/null ;then
        /usr/bin/ssh-add
      else
        start_agent
      fi
    fi
  else
    start_agent
  fi
fi
Configure PuTTY (Windows Only)
Setup a profile in putty by executing the PuTTY binary. Your profile window will open, and you can enter a new name for your session. Perhaps the hostname, or maybe just "Shell Server". I went with naming it "user@host:TMUX". Likewise, you should also fill in the "Host Name (or IP address)" field with user@host. In this window, you can select other options you would like to use. Here are some I would configure:
- Terminal -> Bell -> Action to happen when a bell occurs = None (bell disabled)
- Window -> Lines of Scrollback = 1000 (For the quick "Oops, what did I do" moment)
- Window -> Reset scrollback on keypress = check
- Window -> Reset scrollback on display activity = uncheck
- SSH -> Remote command = tmux a -t base || tmux new -s base (if you're going to use this connection for tmux)
- SSH -> Protocol = 2 only
- SSH -> Auth -> Attempt authentication using Pageant = check (Most Important One)
- SSH -> Auth -> Private key file for authentication = c:\full\path\to\rsa.ppk
- SSH -> X11 -> Enable X11 forwarding = check (Important if you use X11 applications that need to display to your laptop.)
After you've configured everything, head back over to the "Session" screen and select, "Save".
Firing up your ssh agent for the first time
- Windows: Honestly, I'd just go ahead and reboot to make sure Pageant starts up and prompts for a password on bootup. You're running Windows, you should be used to this. :)
- Linux: Open another terminal window. This will source your .profile with added ssh-agent code. You should be prompted for your key's password.
SSH To Shell Server
Lets see how the password-less login works out.
- Windows: Open PuTTY, double-click your saved profile.
- Linux: Open Gnome Terminal, and type "ssh <user>@<hostname>".
If this is your first time accessing the shell server, you will be prompted to accept the SSH server's host public key.
Setup SSH Key access from shell server to all hosts
You will want to run commands in bulk in a lot of circumstances. You will not want to have to enter a password. Similar to how you don't want to enter one for logging into the shell server. The good news is, when you set it up, it'll run until either the ssh-agent process dies, or when the system reboots. If the ssh-agent process dies, just login again and it'll get fired back up. For instructions on how to do this, see the sections above detailing the generation of keys for and setup of the ssh-agent under Linux. Setup the ssh-agent in the shell server's ~/.profile. And put the public key in the ~/.ssh/authorized_keys file of all the hosts you access. Once this is done, scp a file to your homedir on all hosts as a test. A simpler way to do this would be to place the public key of the shell server into the authorized_keys file on the shell server, then scp the authorized_keys file to all hosts you would be accessing. This is assuming there are no other public keys listed in the remote hosts' authorized_keys file for this user.
$ cat ~/.ssh/id_rsa.pub >>~/.ssh/authorized_keys
$ for host in host1 host2 host3 ;do echo ${host} ;ssh ${host} "mkdir -p ~/.ssh && chmod 700 ~/.ssh" ;scp -p ~/.ssh/authorized_keys ${host}:~/.ssh/authorized_keys ;done
$ for host in host1 host2 host3 ;do ssh ${host} "hostname" ;done
| NOTE: The first two commands listed above will prompt you for your password on each host this time. After you have ran them, your password shouldn't be an issue, and the third command should complete without a password prompt. |
Setting up tmux on The Shell Server
The setup of tmux is, for the most part, done for you to some degree. Usually tmux will come with defaults compiled into it and all you really need to do is create your own additional features, or deviations from the built-in config. These user-specific configs are held in the ~/.tmux.conf file. Here are some configurations I use in my setup.
Status Bar
tmux comes natively with a statusbar enabled listing all windows associated w/ the session you're in. I've modified mine to show the session name, all windows open, and which one has focus. Also listed is the date/time as this is extremely useful to reference quickly. Here's an example of what I have configured in ~/.tmux.conf:
set -g status-utf8 on
set -g status-keys vi
set -g status-interval 1
set -g status-attr bright
set -g status-fg white
set -g status-bg black
set -g status-left-length 20
set -g status-left '#[fg=green][#[fg=red]#S#[fg=green]]#[default]'
set -g status-justify centre
set -g status-right '#[fg=green][ %m/%d %H:%M:%S ]#[default]'
setw -g window-status-current-format '#[fg=yellow](#I.#P#F#W)#[default]'
setw -g window-status-format '#I#F#W'
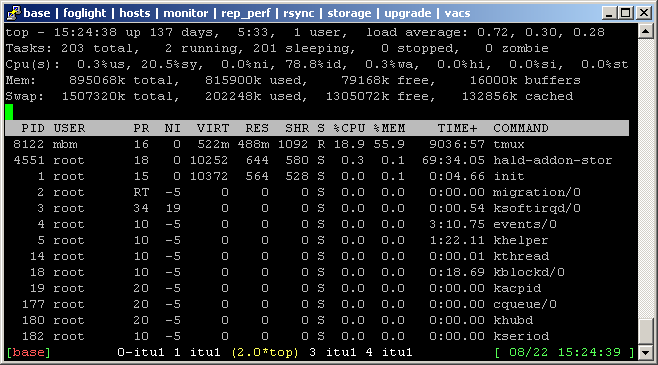
This configuration will produce the following. Window 1 is the current window. Therefore, it is highlighted yellow. If you switched to window 3, the highlighting would move to window 3. There are other goodies you can include in this caption line, but I've found I like to have as much screen realestate as possible on this line. Also of note, if you are using Gnome Terminal and you notice that your caption line is a lighter color than the rest of the screen, you should check your color schemes in your preferences.
| [ | base | ] | _____________________ | 0 bash | __ | (1.0*bash) | __ | 2- bash | __ | 3 bash | _____________________ | [ 08/22 11:06:00 ] |
ShellTitle
Knowing what host your window is logged into and what your window is doing is pretty helpful. If you have many hosts, you may want this to be the hostname of the host you're ssh'd into. If you're running a command, you may want to know what command is running in the window. Along with the statusbar config above, you can get this information easily by adding the following in your ~/.profile on all the hosts you connect to (including your shell server):
- Linux:
look_for_cmd=0
print_cmd() {
  if [ ${look_for_cmd} = 1 ] ;then
    if [ "${BASH_COMMAND}" != 'print_host' ] ;then
      cmdline=$(history 1 | xargs | cut -d\  -f3-)
      if [[ "${cmdline}" =~ ^(sudo|ssh|vi|man|more|less)\  ]] ;then
        first=$(echo "${cmdline}" | awk '{print $1}')
        for i in ${cmdline} ;do
          if ! [[ "${i}" =~ ^-.*$ ]] && ! [[ "${i}" =~ ^${first}$ ]] ;then
            cmd="${first}[${i}]"
            break
          fi
        done
      elif [[ "${cmdline}" =~ ^[A-Z]*=.*$ ]] ;then
        cmd=$(echo ${cmdline} | awk '{print $2}')
      else
        cmd=$(echo ${cmdline} | awk '{print $1}')
      fi
      echo -ne "\033k${cmd}\033\\" 1>&2
      look_for_cmd=0
    else
      return
    fi
  fi
}

print_host() {
  echo -ne "\033k${HOSTNAME}\033\\" 1>&2
  look_for_cmd=1
}

PROMPT_COMMAND="print_host"

trap "print_cmd" DEBUG
- HPUX:
There is no real possible way, with any of the shells that HPUX has natively at its disposal, to add this functionality. I had to resort to adding bash to all my systems, and setting my shell accordingly.
After adding this code to your ~/.profile, the status line will appear as such:
| [ | base | ] | _______________ | 0 vi[myfile.txt] | __ | (1.0*host4) | __ | 2- top | __ | 3 host10 | _______________ | [ 08/22 11:06:00 ] |
Notice that focus is on window 1. He and window 3 are logged into various hosts while window 2 is running the top command. Also note that window 0 is running vi on a file named "myfile.txt". This is because in the block of code above, I've specifically told it to print what the argument is that the command is running, should the command be one of:
- sudo
- ssh
- vi
- man
- more
- less
This gives you more insight into what specifically is going on within the window at a glance. Feel free to add your own commands as you see fit to the list.
TIP: If you have prefixes or suffixes to all or most of your hostnames, you can gain some realestate by creating a variable containing the hostname with the prefix/suffix removed like so...
export SHORTHOST=$(echo ${HOSTNAME} | sed 's/^prefix//; s/^suffix//; s/^lmnop//')
(where "prefix", "suffix" and "lmnop" are the strings you would like removed from your hostnames) ...and placing the ${SHORTHOST} variable in place of ${HOSTNAME} in the "print_host()" function above. |
Sample ~/.tmux.conf
I've done some heavy remapping of keys to be more inline with what I'm used to with GNU Screen. I've also included the status bar configuration listed above. Here's what my current ~/.tmux.conf looks like:
##########################################
# STATUS BAR
set -g status-utf8 on
set -g status-keys vi
set -g status-interval 1
set -g status-attr bright
set -g status-fg white
set -g status-bg black
set -g status-left-length 20
set -g status-left '#[fg=green][#[fg=red]#S#[fg=green]]#[default]'
set -g status-justify centre
set -g status-right '#[fg=green][ %m/%d %H:%M:%S ]#[default]'
setw -g window-status-current-format '#[fg=yellow](#I.#P#F#W)#[default]'
setw -g window-status-format '#I#F#W'


##########################################
# TERMINAL EMULATOR TITLES
set -g set-titles on
set -g set-titles-string "#(tmux ls | awk -F: '{print $1}' | xargs | sed 's/\ / | /g')"


##########################################
# KEY BINDINGS
# C-a = prefix
unbind C-b
set -g prefix C-a

# C-a = last-window
unbind l
bind C-a last-window

# C-a = new-window
bind C-c new-window

# Esc = copy-mode
unbind [
bind Escape copy-mode

# | = horizontal split
unbind %
bind | split-window -h

# - = vertical split
unbind '"'
bind - split-window -v

# " = choose-window
bind '"' choose-window

# h = display cheatsheet
bind h run "cat ~/.tmux_cheatsheet"

# r = tmux renumbering script
unbind r
bind r run "~/bin/tmux_renum"

# r = respawn after exit or disconnect (zombie)
bind C-r respawn-window

# k = kill after exit or disconnect (zombie)
bind C-k kill-window


##########################################
# BASIC CONFIG
# utf8 ability
setw -g utf8 on

# vi Style Editing
setw -g mode-keys vi

# Make mouse useful in copy mode
setw -g mode-mouse on

# Allow mouse to select which pane to use
set -g mouse-select-pane on

# Allow xterm titles in terminal window, terminal scrolling with scrollbar, and setting overrides of C-Up, C-Down, C-Left, C-Right
set -g terminal-overrides "xterm*:XT:smcup@:rmcup@:kUP5=\eOA:kDN5=\eOB:kLFT5=\eOD:kRIT5=\eOC"

# Scroll History
set -g history-limit 30000

# Set ability to capture on start and restore on exit window data when running an application
setw -g alternate-screen on

# Lower escape timing from 500ms to 50ms for quicker response to scroll-buffer access.
set -s escape-time 50
Brief Tutorial
A brief synopsis of how tmux works. The man page has much more useful information. These are based on re-mappings from my config listed above.
- Log into machine.
- Run "tmux"
- ^a,c == creates new window
- ^a,a == switches to previously accessed window
- ^a,0 == switches to screen number 0
- ^a,8 == switches to screen number 8
- ^a,d == detaches from current session
- ^a," == gives a listing of windows for the session
- ^a,<esc> == copy mode (which also lets you utilize your tmux scrollback buffer); use vi-keys to navigate
Using Multiple tmux Sessions
Using the method above makes for great organization and minimizes clutter on your screen. If you're a seasoned admin, and you have used multiple separate windows for some time, it does take some getting used to and you will have to re-train your brain for this new methodology. To take full advantage of the statusbar, you will most likely want to use a full-screen window for your terminal window. Having two monitors helps. I use a laptop screen, and a monitor. The more monitors, the merrier, but if you use a terminal window for a living, at least one dedicated for terminal window works best.
There will be times when even the above organization becomes un-manageable. You could end up with 20 or more windows inside your tmux session, and trying to remember what each is doing and in what order they are in can become unwieldy. Fortunately, tmux is written to manage multiple sessions and even move windows and panes between sessions. Listed in my sample configuration above, is the lines that you can place at the top of your terminal window to give a brief listing of the sessions you have at your disposal. Here's the specific code:
set -g set-titles on
set -g set-titles-string "#(tmux ls | awk -F: '{print $1}' | xargs | sed 's/\ / | /g')"
Unlike the GNU Screen setup with tabbed terminal clients, you no longer need a tabbed terminal client if you use this as you'll know which sessions you have available to you. You can use the following two methods to switch to the other "tab" (session):
- ^a,:,attach -t other_session_name
- ^a,s, use arrow keys or number keys to select a session from the list
Extras
X11 Forwarding Issues
You may notice if you use X11 Forwarding through SSH that with multiple screen sessions, your $DISPLAY might not be current. To remedy this, here's a script that can be placed in your ~/.profile. When you encounter this issue, just run "update_display" on the shell server, and give "xclock" a go. You should see the clock open up on your laptop. Close it, and login to any of your systems, and X11 should forward properly to your Xserver locally on your laptop.
update_display() {
  good_display=$(netstat -an | /bin/grep 0\ [0-9,:,.]*:60..\  | awk '{print $4}' | tail -n 1)
  good_display=${good_display: -2}
  export DISPLAY=${HOSTNAME}:${good_display}.0
}
Renumbering Windows
See the Renumbering tmux Windows page for details.
Resurrecting tmux Sessions After Reboot
See the tmux_resurrect script page for details.
Profiling Hosts
See the loadvars script page for details.